How to Earn the Azur Armor Set Through Sellen's Longest Quest
Unlock the Azur Armor Set in Elden Ring: journey from Sellen's cellar to Azur's frozen vigil, through illusion caves for the primeval sorcerer's robes.
Chasing the Azur Armor Set in Elden Ring feels a bit like trying to find a secret room in a mansion where every door you open reveals three more doors to choose from—it’s a labyrinth of choices, illusions, and forgotten grudges. But when you finally slip into that crown-shaped glintstone crown, every dead end and every defeated demigod will feel like a perfectly placed piece of a cosmic puzzle.
I’m going to walk you through the whole journey as if we’re peeling an onion made of starlight, one translucent layer at a time. By the end, you’ll be wearing the same robes that once belonged to the primeval sorcerer Azur, and you’ll wonder why you ever settled for anything less.
Meeting the Teacher in a Cellar
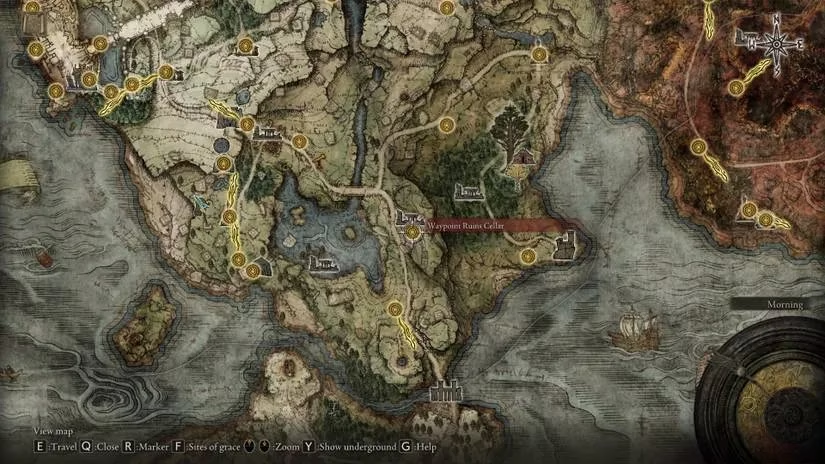
Before anything else, you need to find Sellen, the exiled sorceress tucked away in the Waypoint Ruins in Limgrave. It’s just east of the lake, guarded by a Mad Pumpkin Head that’s about as subtle as a falling meteor. Defeat that brute, then slip downstairs and introduce yourself. She’s polite, if a little too fond of forbidden knowledge—think of her as the professor who got fired for teaching the uncensored curriculum.
After a few chats, she will ask you to fetch something precious from a reclusive master. That master is Azur himself, perched on a ledge in Mt. Gelmir like a stone gargoyle who forgot how to move. You’ll need to reach the Hermit Village and look for a barely visible trail that leads to his spot right next to a Site of Grace. When you find him, he’s frozen in a trance—don’t expect small talk. Just take the spell Comet Azur from him; it’s the key that will crack open the next stage of this chain.
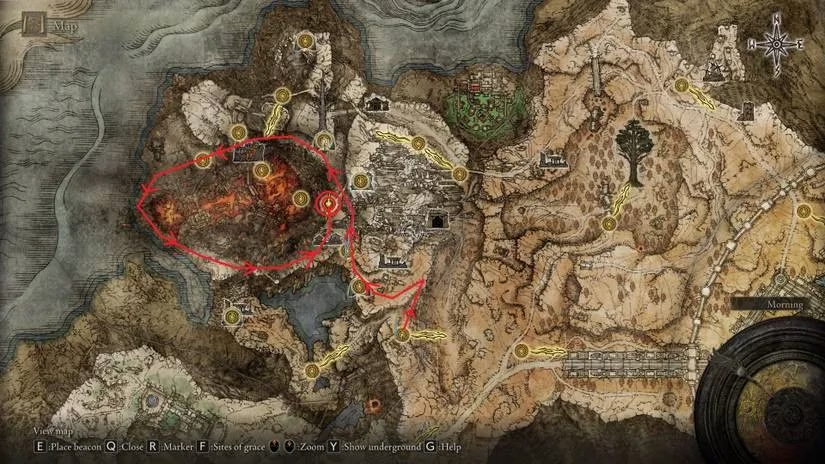
Take that spell back to Sellen, and she will hand you a curious item: the Sellian Sealbreaker. This isn’t just a trinket—it’s your passport into an illusion-shrouded cave in Caelid where the real legwork begins.
The Cave of Vanishing Walls and Ruinous Stars
From the Fort Faroth Site of Grace, you’ll find a rock face that looks completely ordinary but dissolves when you strike it. That’s the entry to a cave that behaves like a nested dream: behind one illusionary wall, you’ll find another, and then another. It’s reminiscent of a set of Russian dolls, each one hiding a smaller version of the same mystery inside. After dropping down through crystal formations, you’ll encounter a sorcerer guarding a blue magical seal. Use the Sealbreaker, enter the chamber, and speak to the NPC inside to claim Stars of Ruin. This spell isn’t just a reward—it’s a ticket to Sellen’s true ambitions.
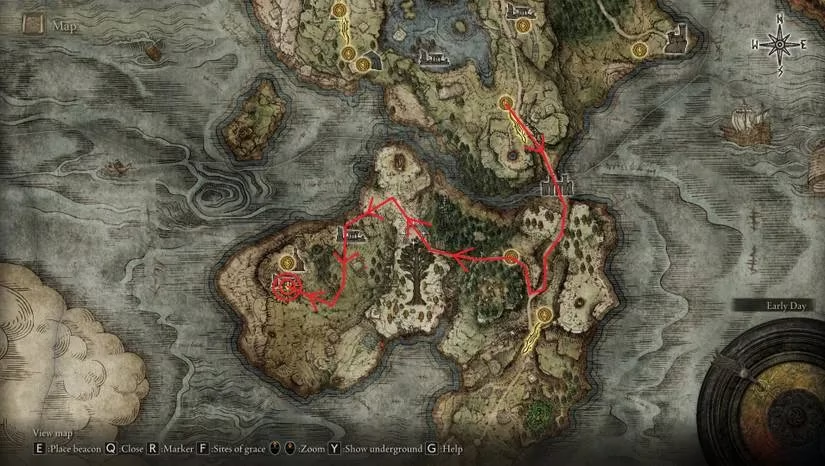
Return to Waypoint Ruins and exhaust her dialogue. Then, head far south to the Weeping Peninsula and search for the Witchbane Ruins. Down in the prison beneath, you’ll find another facet of Sellen—a chained, physical body. It’s unsettling, like finding a photocopy of a friend who insists the original is still at the library. Talk to her here, and you’ll receive an assignment that sends you straight into the heart of Liurnia’s royal dramas.
Breaking the Carian Siege
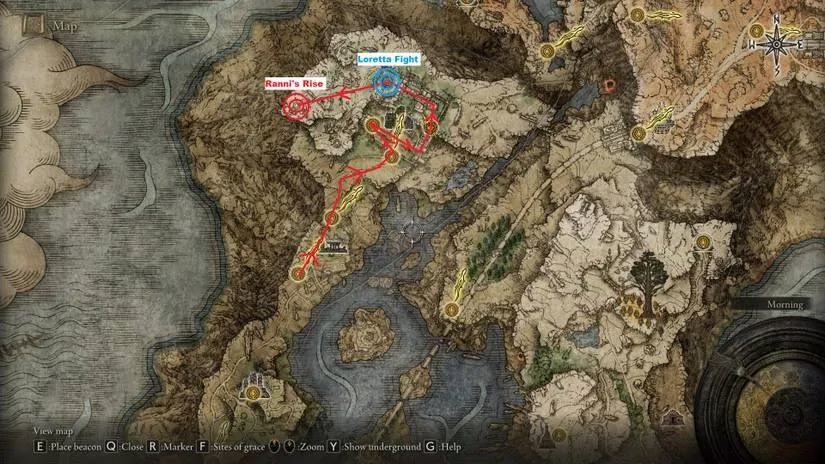
To move the quest forward, you have to raid the Carian Manor in northwestern Liurnia. Inside, Royal Knight Loretta guards a passage to Ranni’s domain like a sentinel of cold silver. The path to the manor is masked by an illusionary wall at Kingsrealm Ruins, so don’t trust your eyes. Once you beat Loretta and step through the new door into Ranni’s Rise, the real secret is hidden outside. From the tower’s entrance, go northeast until you stumble upon small ruins and a lone enemy. Hit the floor there—yes, the floor—to reveal a hidden staircase and another false wall. Behind it, a projection of Sellen waits. She will push you toward the next colossal hurdle.
The Festival, the Queen, and the Choosing Minute
You must now defeat Starscourge Radahn if you haven’t already. After the festival ends, return to Redmane Castle’s courtyard and find Jerren, the flamboyant announcer who plays a much larger role than his costume suggests. Speak with him, then travel back to Witchbane Ruins. You’ll see Jerren and Sellen locked in a tense reunion; exhaust his dialogue until he departs.
Now comes the encounter that decides your reward. Defeat Rennala, Queen of the Full Moon, at the Academy of Raya Lucaria (if you haven’t already), then exit her boss arena through the grand front door. Right on the steps, you’ll see two summoning signs: a golden one and a red one. This moment is like standing at a crossroads where one path leads to a campfire and the other to a forge—both warm, but only one will temper your steel. Choosing the golden sign means you help Sellen fight Jerren. Do that, and after the battle, speak with Sellen until she repeats herself.
Rest at any Site of Grace and look at the entrance hall again: Sellen has vanished, replaced by a heavy quiet. The Azur Armor set is now only a short fast-travel away.
Claiming the Primeval Threads
Warp back to the exact spot where you first found Azur in Mt. Gelmir. Instead of the petrified sorcerer, you’ll see a glowing collection of items on the ground. Pick them up, and you’ll receive the full Azur Armor set: the glintstone crown, the worn robes, and the weathered gloves and boots. Equipping it feels like wrapping yourself in the echoes of a thousand failed experiments—each piece hums with a power that’s both ancient and dangerously unrefined.
This set isn’t just about fashion. The crown in particular boosts the damage of Comet Azur at the cost of additional FP consumption, making it a double-edged scalpel for high-intellect builds. The entire outfit offers respectable magic defense, but its true value lies in how it transforms your spellcasting identity. You’re no longer a scrappy vagabond; you’re inheriting the mantle of a sorcerer who looked directly at the primeval current and didn’t blink.
What I love most about this quest is how it rewards patience and attention to detail. Glowing swords and shiny shields are easy to find, but an armor set that requires you to navigate illusions, choose sides, and understand the deep history of the Carian and Raya Lucaria feud? That’s a treasure map written in invisible ink. If you follow the steps above, you’ll finish one of the most memorable side stories in Elden Ring, and you’ll walk away wearing proof that you didn’t just fight monsters—you untangled a myth.